

At Prove, we are big fans of microservices à la Docker and Elastic Beanstalk. And for good reason. Containerization simplifies environment generation, and Beanstalk makes it easy to deploy and scale.
Both promise an easier life for developers, and both deliver, mostly. But as with all simple ideas, things get less, well simple, as the idea becomes more widely adopted and then adapted into other tools and services with different goals.
Soon there are overlaps in functionality, and gaps in the knowledge base (the Internet) quickly follow. Let’s take an example.
When you first jump into Docker, it makes total sense. You have this utility docker, and you write a Dockerfile that describes a system. You then tell docker to read this file, and magically, a full-blown programming environment is born. Bliss.
But what about running multiple containers? You’ll never be able to do it all with just a single service. Enter docker-compose, a great utility for handling just this. But suddenly, what was so clear before is now less clear:
- Is the docker-compose.yml supposed to replace the Dockerfile? Complement it?
- If they’re complementary, do options overlap? (Yes.)
- If options overlap, which should go where?
- How do the containers address each other given a specific service? Still localhost? (Not necessarily.)
Add in something like Elastic Beanstalk, its Dockerrun.aws.json file, doing eb local run, and things get even more fun to sort out.
In this post, I want to highlight a few places where the answers weren’t so obvious when trying to implement a Flask service with MongoDB.
To start, it’s a pretty straightforward setup. One container runs Flask and serves HTTP, and a second container serves MongoDB. Both are externally accessible. The MongoDB is password protected, naturally, and in no way am I going to write my passwords down in a config file. They must come from the environment.
Use the Dockerfile just for provisioning
The project began its life with a single Dockerfile containing an ENTRYPOINT to start the app. This was fine while I was still in the early stages of development — I was still mocking out parts of external functionality or not even handling it yet.
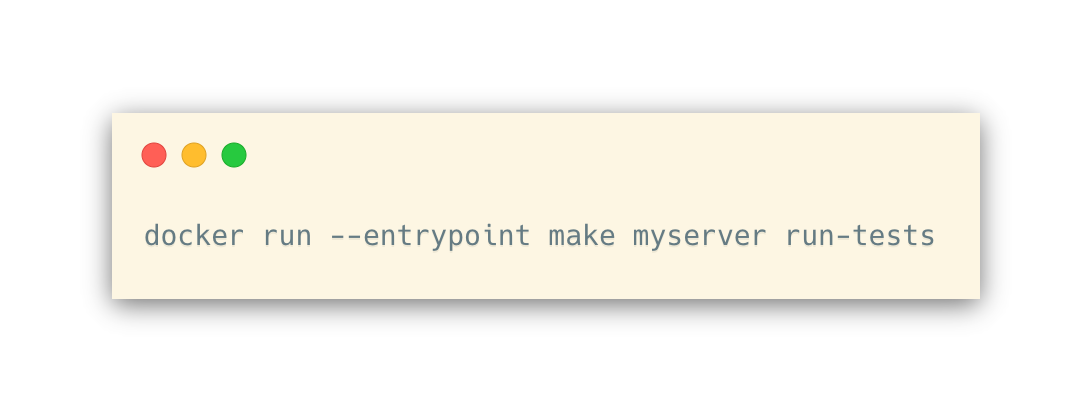
But then I needed the same setup to provide a development environment with actual external services running, and the ENTRYPOINT in the Dockerfile became problematic. And then I realized — you don’t need it in the Dockerfile, so ditch it. Let the Dockerfile do all the provisioning and specify your entrypoint in one of the other ways. From the command line:
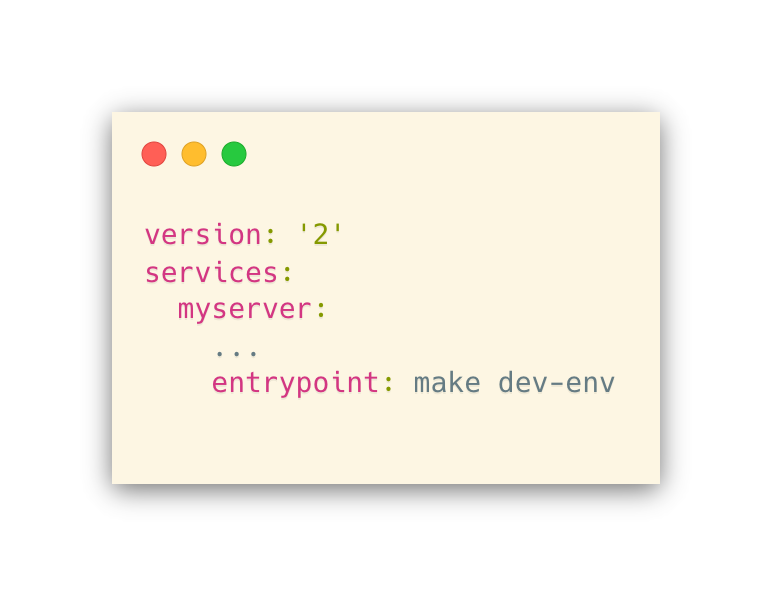
Or, from your docker-compose.yml you can do it like
This handily solved the problem of having a single environment oriented to different needs, i.e., test runs and a live development environment.
Don’t be afraid of multiple Dockerfiles
The docker command looks locally for a file named Dockerfile. But this is just the default behavior, and it’s pretty common to have slightly different configs for an environment. E.g., our dev and production environments are very similar, but we have some extra stuff in dev that we want to weed out for production.
You can easily specify the Dockerfile you want by using docker -f Dockerfile.dev ..., or simply using a link: ln -s Dockerfile.dev Dockerfile && docker ...
If your docker-compose.yml specifies multiple containers, you may find yourself in the situation where you not only have multiple Dockerfiles for a given service but Dockerfile(s) for each service. To demonstrate, let’s say we have the following docker-compose.yml
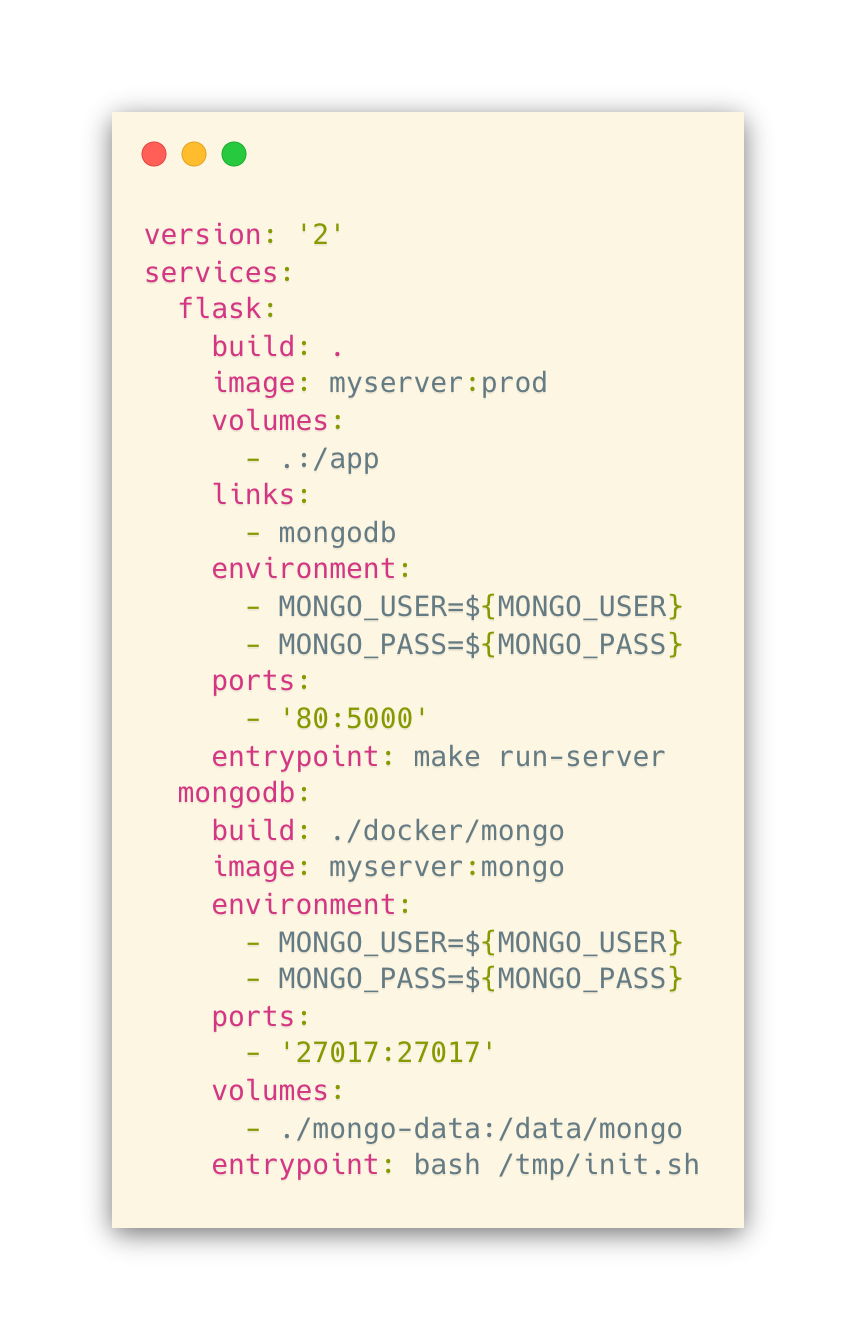
In the source tree for the above, we have Dockerfiles in the following locations:
Dockerfile.dev
Dockerfile.prod
docker/mongo/Dockerfile
The docker-compose command uses the build option to tell it where to find the Dockerfile for a given service. The top two files are for the Flask service, and the appropriate Dockerfile is chosen using the linking strategy mentioned above. The mongodb service uses its own Dockerfile kept in a certain folder. The line build: ./docker/mongo tells docker where to look for it.
Dockerrun.aws.json, the same, but different
Enter Elastic Beanstalk and Dockerrun.aws.json. Now you have yet another file, and it pretty much duplicates docker-compose.yml — but of course with its own personality.
You use Dockerrun.aws.json v2 to deploy multiple containers to Elastic Beanstalk. Also, when you do eb local run, the file .elasticbeanstalk/docker-compose.yml is generated from it.
Here’s what the Dockerrun.aws.json corollary of the above docker-compose.yml file looks like:
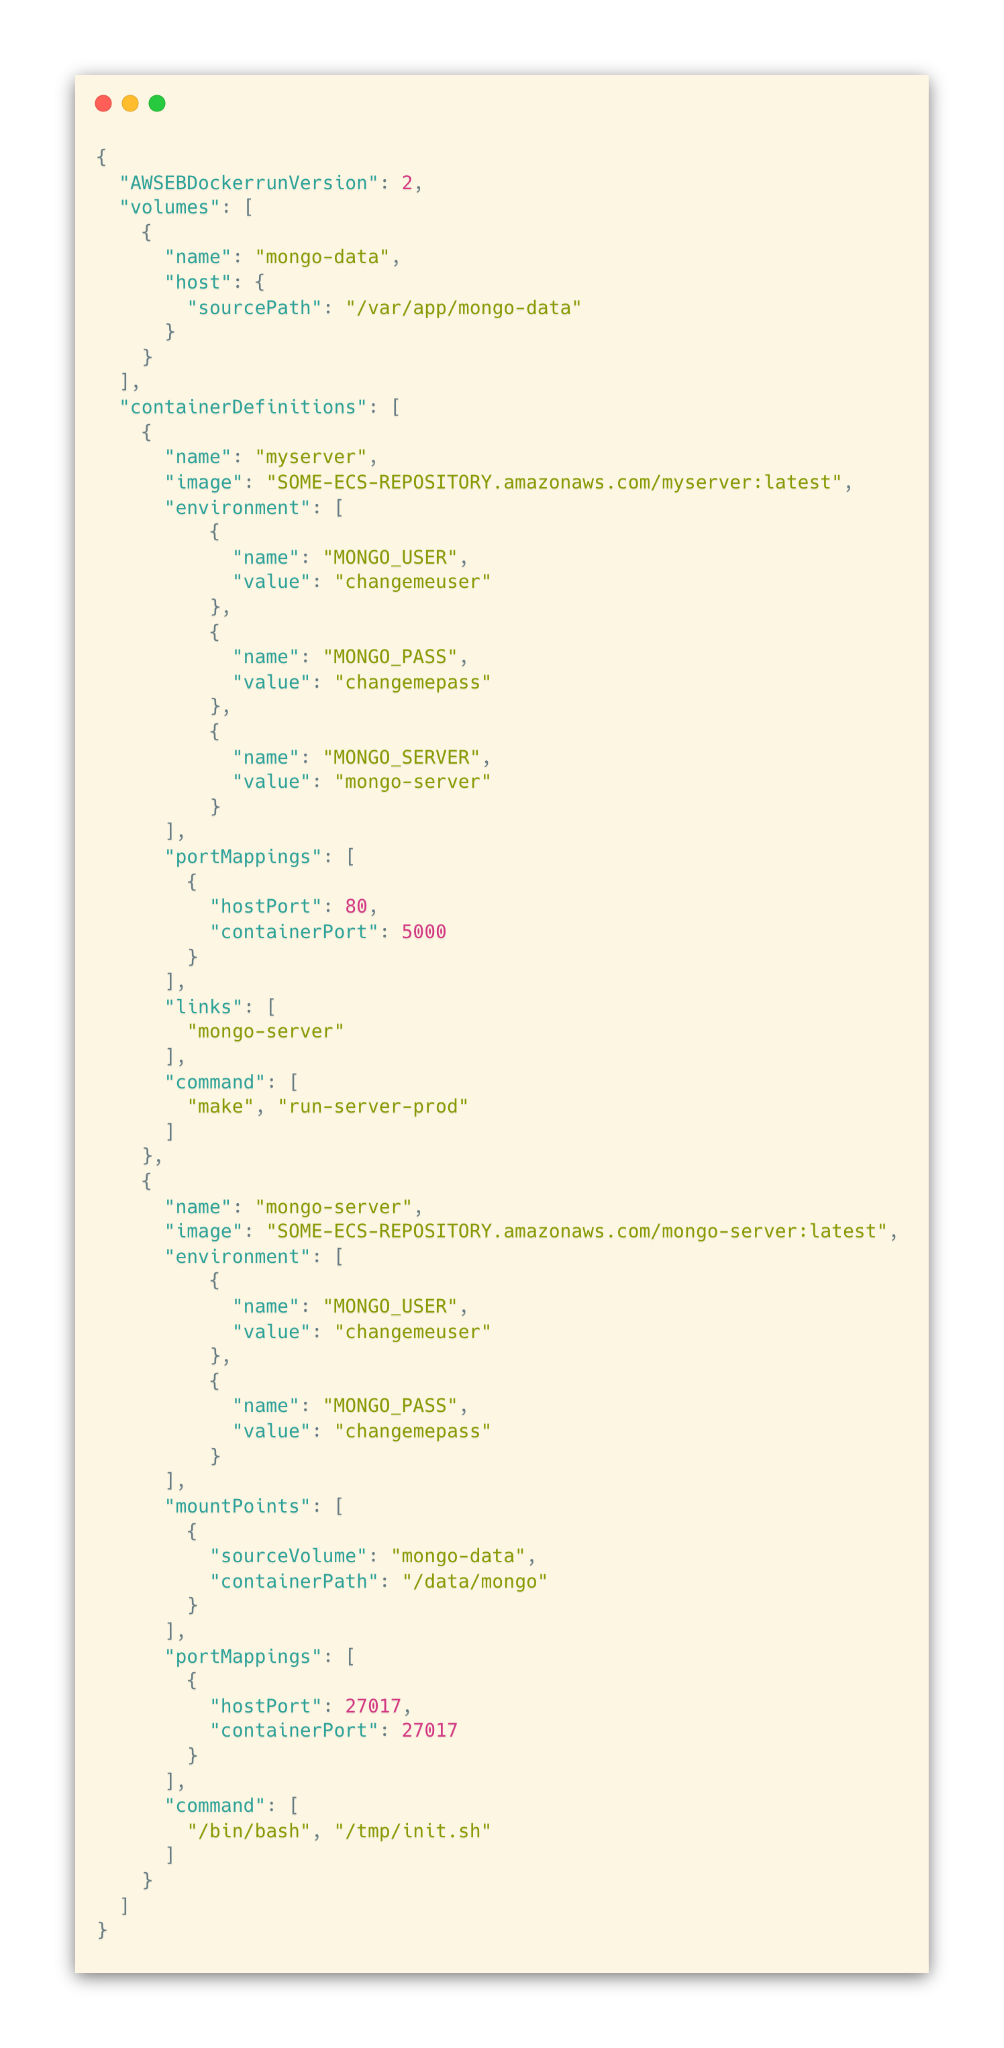
Let’s highlight a few things. First, you’ll see that the image option is different, i.e.

This is because we build our docker images and push them to a private repository on Amazon ECS. On deployment, Beanstalk looks for the one tagged latest, pulls, and launches.
Next, you may have noticed that in docker-compose.yml we have the entrypoint option to start the servers. However, in Dockerrun.aws.json we’re using "command".
There are some subtle differences between ENTRYPOINT and CMD. But in this case, it’s even simpler. Even though Dockerrun.aws.json has an "entryPoint" option, the server commands wouldn’t run. I had to switch to "command" before I could get eb local run to work. *Shrug.*
Another thing to notice is that in docker-compose.yml we’re getting variables from the host environment and setting them into the container environment:
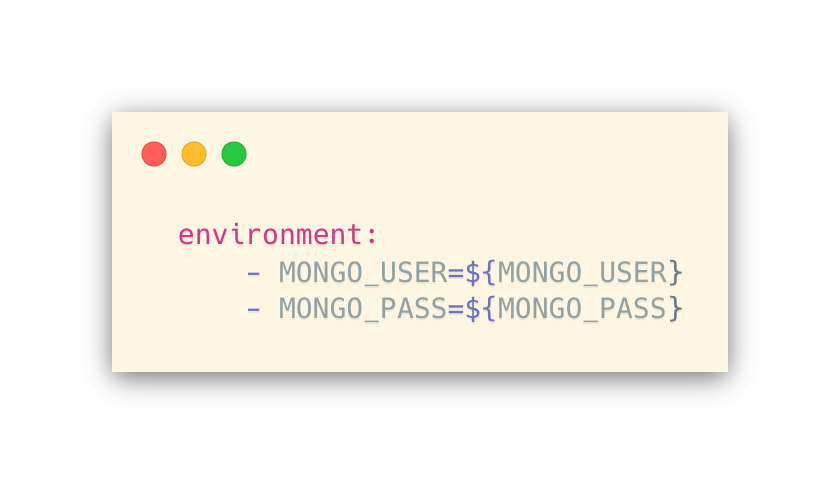
Very convenient. However, you can’t do this with Dockerrun.aws.json. You’ll have to rewrite the file with the appropriate values, then reset it. The next bit will demonstrate this.
We’re setting a local volume for MongoDB with the following block:
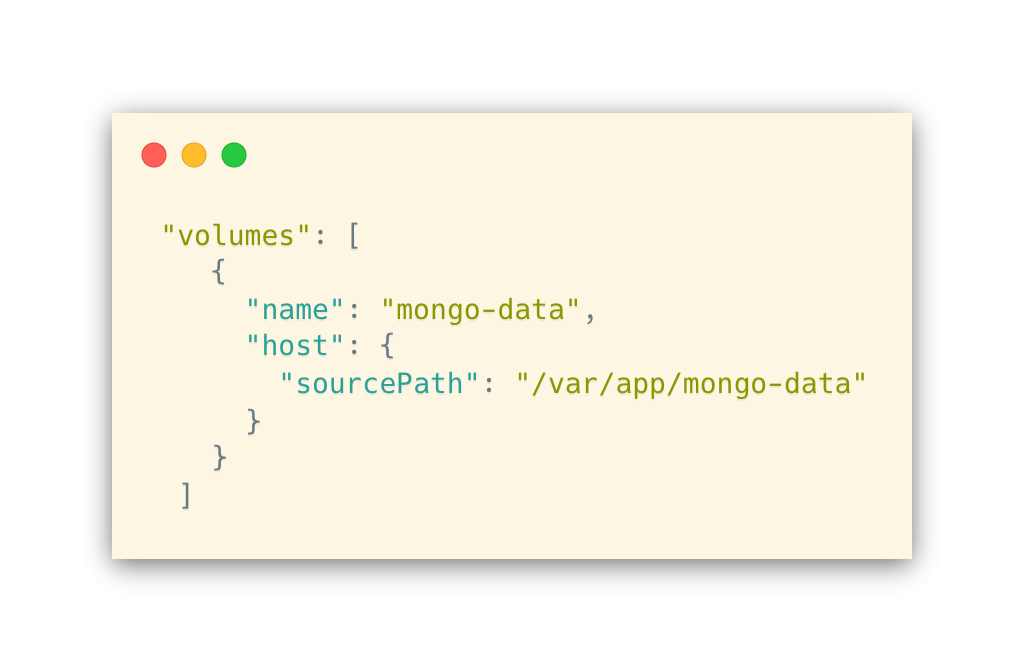
The above path is production-specific. This causes a problem with eb local run, mainly because of permissions on your host machine. If you set a relative path, i.e.

the volume is created under .elasticbeanstalk/mongo-data, and everything works fine. On a system with Bash, you can solve this pretty easily by doing something along the following lines:
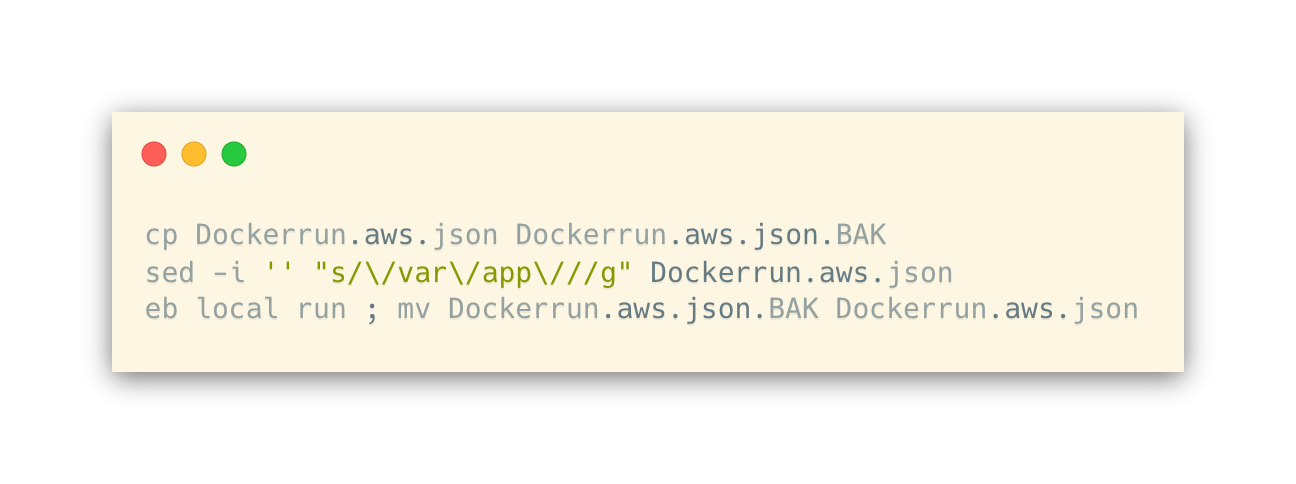
We just delete the /var/app/ part, run the container locally, and return the file back to how it’s supposed to be for deploys. This is also how we set the password — changemepass — from the environment on deploy.
Last, you’d think running eb local run, which is designed to simulate an Elastic Beanstalk environment locally via Docker, would execute pretty much the same as when you invoke with docker-compose up.
However, I discovered one frustrating gotcha. In our Flask configuration, we are addressing the MongoDB server with mongodb://mongodb (instead of mongodb://localhost) in order to make the connection work between containers.
This simply did not work in eb local run. Neither did using localhost. It turns out the solution is to use another environment variable, MONGO_SERVER. In our Flask config, we do the following, which defaults to mongodb://mongodb:
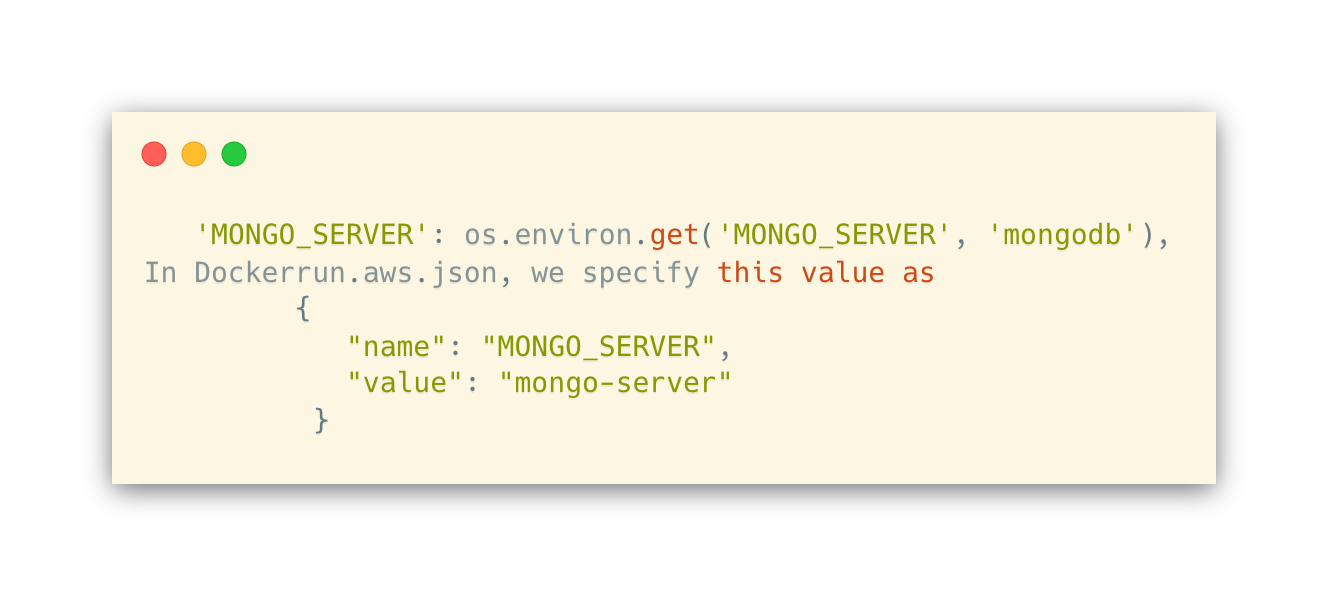
Why? Because the "name" of our container is mongo-server and eb generates an entry in /etc/hosts based on that.
So now everything works between docker-compose up, which uses mongodb://mongodb, and eb local run, which uses mongodb://mongo-server.
These are just a few of the things that might confound you when trying to do more than just the basics with Docker and Elastic Beanstalk. Both have a lot to offer, and you should definitely jump in if you haven’t already. Just watch out for the gaps!
To learn about Prove’s identity solutions and how to accelerate revenue while mitigating fraud, schedule a demo today.

Keep reading

Industry leaders gathered at Prove's Improve Connect summit to discuss balancing frictionless digital experiences with the threat of AI-powered fraud. Experts from companies like Coinbase, Bluevine, and Google shared insights on navigating the challenges and opportunities of emerging technologies.

Digital identity theft is the new frontier of crime, where criminals steal our online "keys" to unlock financial accounts, social media, and even medical records, causing widespread damage and eroding trust in the digital world. Companies inadvertently contribute to this problem by failing to adequately protect user data with secure software development practices.

As organizations in the UK prioritize business growth through online transactions, establishing trust & safety with users is rapidly becoming the critical element that offers a competitive advantage.


